Changing a light bulb is one of those “adulting” tasks that seems simple until you’re staring at a weird socket you’ve never seen before. If you’ve ever felt a little intimidated standing on a ladder, don’t worry—this is a no-judgment zone.
Whether your desk lamp just flickered out or you’re finally upgrading to energy-saving LEDs (see this guide on when to switch your old light bulb for an LED), here is exactly how to do it safely and correctly the first time.
What You’ll Need
- A sturdy stool or ladder: Avoid the temptation to use a swivel office chair—it’s the leading cause of “light bulb-related” gravity mishaps!
- A clean cloth or gloves: Especially important for certain bulb types (see below).
- Your replacement bulb: Matched by socket and brightness.
Step 1: Safety First (Seriously)
- Turn off the power: Flip the wall switch to “Off”.
- Unplug portable lamps: If it’s a floor or desk lamp, pull the plug from the wall.
- The “Breaker” Rule: For ceiling or wall-mounted fixtures, I recommend switching off the circuit breaker for that room. Some older switches don’t fully disconnect the “live” wire, and a small extra step is worth your security.
- Let it cool: If the light was just on, wait 5 minutes. Incandescent and halogen bulbs get hot enough to cause skin burns.
Step 2: Identify and Remove the Old Bulb
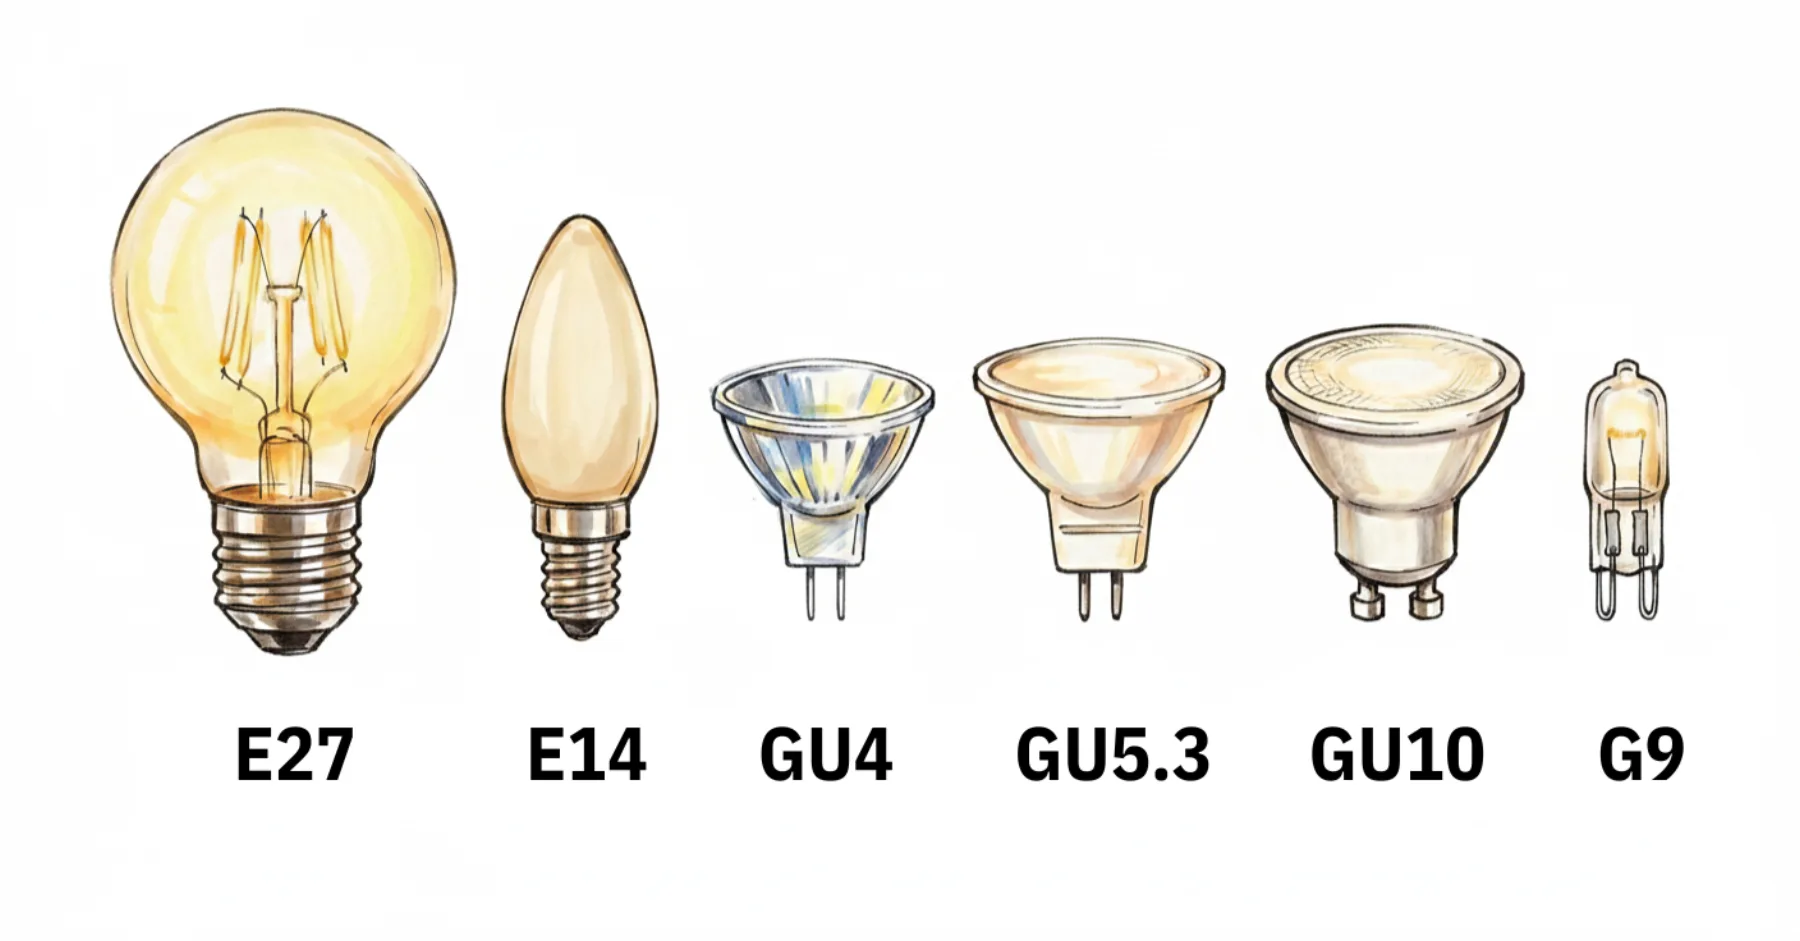
Not all bulbs are “lefty-loosey.” Identify your bulb type by looking at how it sits in the socket.
E14 / E27 — Screw Bases (Edison Thread)
- The Look: Round and smooth at the front. Common in lamps and chandeliers.
- How to remove: Hold the bulb firmly but gently. Turn counterclockwise until it unscrews completely.
GU10 — Twist & Lock Spotlights
- The Look: Flat-fronted, sitting flush in the ceiling.
- How to remove: Push the bulb in slightly, then turn counterclockwise a quarter turn. Once the pins line up with the slots, it will drop into your hand.
G9 & GU4 / GU5.3 — The “Capsule” Bulbs
- The Look: Small, clear, with two pins (G9s have U-shaped loops; GU4/5.3 have straight pins).
- How to remove: Grasp the bulb and pull straight out. No twisting!
- ⚠️ Pro-Tip (The Skin Oil Warning): If you are replacing these with new halogen bulbs, never touch the glass with bare fingers. The oils from your skin create “hot spots” that can cause the bulb to crack or explode when it heats up. Use a clean cloth or wear gloves.
Step 3: Choose the Right New Bulb
Before you head to the store, check your old bulb for three things: Socket type, Brightness, and Color.
Lumens vs. Watts: The Cheat Sheet
We used to buy bulbs based on Watts (energy used), but with modern LEDs, we look at Lumens (brightness). Use this table to find your match:
| Old Incandescent (Watts) | New LED Equivalent (Watts) | Brightness (Lumens) | Best For: |
| 40W | 4–6W | 450 lm | Nightstands / Mood lighting |
| 60W | 7–9W | 800 lm | Reading lamps / Hallways |
| 75W | 10–12W | 1,100 lm | Kitchens / Work spaces |
| 100W | 14–17W | 1,600 lm | Large rooms / High ceilings |
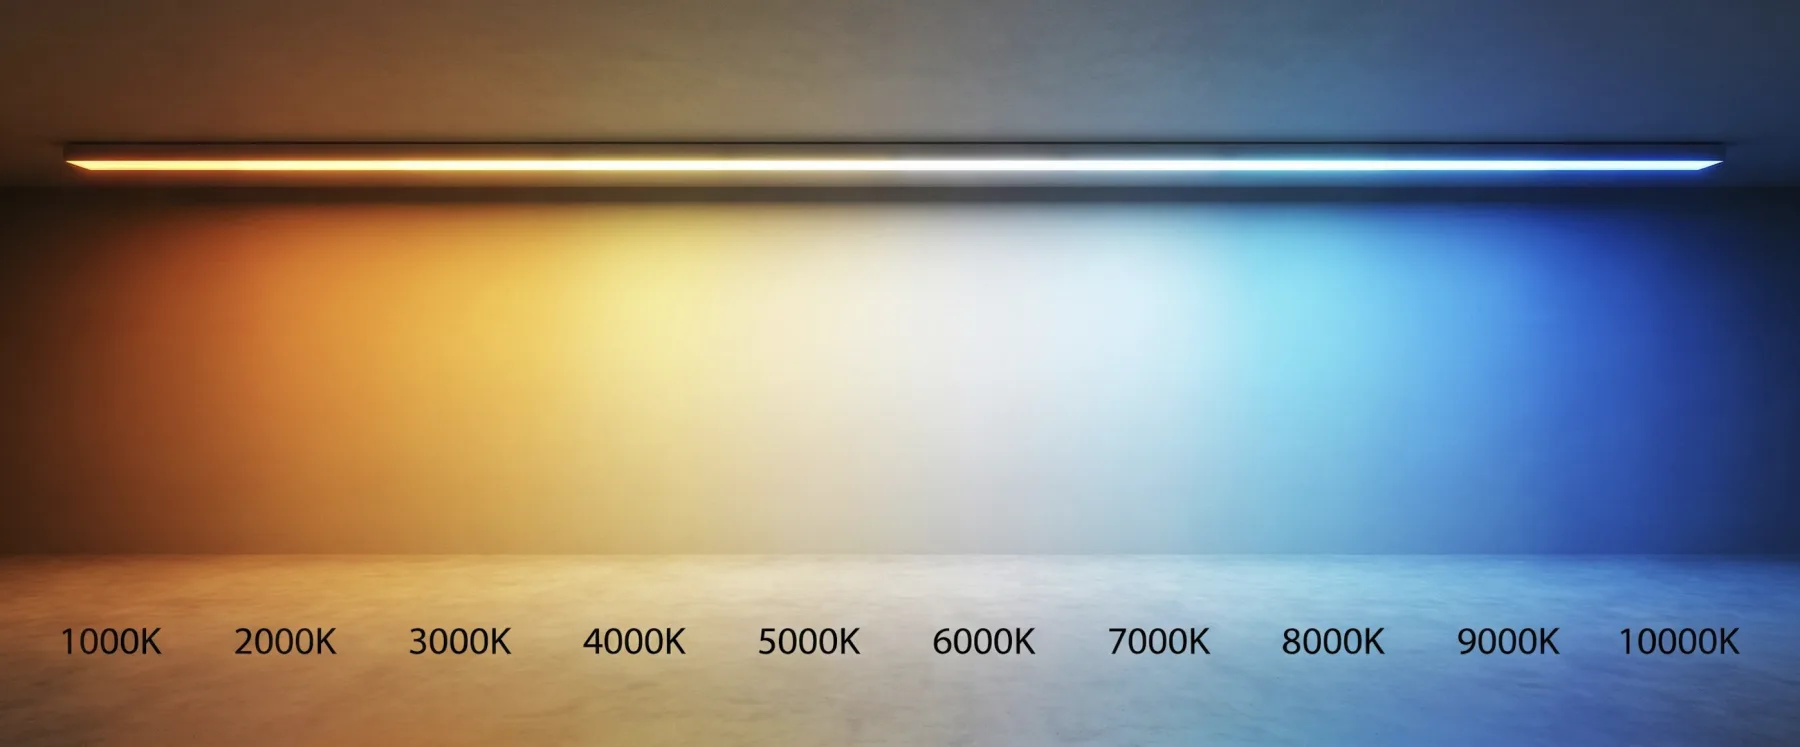
Pick Your “Vibe” (Color Temperature)
- Warm White (2700K): Cozy, yellow light. Best for bedrooms and living rooms.
- Neutral White (4000K): Crisp and clean. Best for kitchens and bathrooms.
- Daylight (5000K+): Very blue/bright. Best for garages or task lighting.
Step 4: Install and Test
- Insert the new bulb: Follow the reverse of the removal process (Screw in, Twist-and-lock, or Push-in).
- Don’t over-tighten: For screw-in bulbs, stop as soon as you feel resistance. Overtightening can flatten the tab inside the socket.
- Restore power: Turn your breaker back on and flip the switch.
Troubleshooting: What if it goes wrong?
- The bulb is stuck: If a screw-in bulb won’t budge, try wearing a rubber glove. It provides the extra grip you need to break the seal without applying too much breaking pressure.
- The glass broke in the socket: Stop! Ensure the power is off at the breaker. Use a pair of needle-nose pliers to carefully unscrew the metal base remaining in the socket.
- The new LED flickers: This usually happens if the bulb is on a dimmer switch that isn’t “LED-compatible.” You may need to swap the switch or find a specific “Dimmable LED” bulb.
Responsible Disposal
Don’t just toss them in the kitchen bin!
- LEDs: Recyclable at most major hardware stores.
- CFLs (Spiral bulbs): Contain trace amounts of mercury. These must be taken to a recycling center or a designated drop-off point.
- Incandescents: These can generally go in the regular trash as they don’t contain toxic chemicals, but wrapping them in old newspaper first helps prevent the glass from cutting through the bag.